Wednesday, March 12, 2014

Going Gray: What Will the Kids Say??

A son and his mom
A son and his mom
We get it!
Your kid’s opinion means a lot.  For a lot of us, it was just yesterday we were giving them advice about what to wear, how to look, etc.  I guess it’s their turn now?  How time flies.  We receive a lot of emails and comments about how children react when mom decides to go gray.  Well, here’s an email we received a few years ago that will warm your heart:
I am a 32 year old guy and I love gray hair, I love everything natural. I came across this blog looking for pictures to send my mom (of women with gray hair because I am trying to convince her that her gray hair is beautiful, it’s a shame that she is not proud of it.) I make a point to compliment women with natural gray hair – not because I have some crazy agenda but because I genuinely find gray hair attractive, and women smart and confident enough to sport it admirable, intriguing, interesting, and beautiful regardless of how they look. It’s unfortunate that anyone is made to feel that their natural look is not acceptable, so much so that most women wouldn’t even dare go with it. (But natural always looks the best and ironically even hair color and make up makers always market their products with statements like “for natural highlights” for “natural tone” etc… :) you know what looks most natural? Your natural hair! It looks the most beautiful as well. I am thrilled to find this blog and I’ll do what I can to spread the word! Thank you!
via:http://goinggrayblog.com/2014/01/mom-decides-going-gray-will-kids-say/

Girl Gone Gray: A Radical Makeover

shira
Have you ever wished you could snap your fingers and just start all over again?
Well, there is a way!
In January of 2006 I did the unimaginable…I voluntarily shaved my head! It was really the only solution for me after ten years of coloring my hair just about every few weeks. It felt dry, unhealthy, and most of all, fake. I also felt like I was hiding something – like a secret. My curiosity about the color grew with every peek-a-boo session from my roots, begging me to touch them up. I had a feeling that the only way I could get to the true natural color quickly and successfully, was to start the growth process from scratch, even if it meant shaving it all off. I never considered an alternative, and was confident that I could deal with it, no matter how and what color it grew back.
 AN ARTSY ‘DO’
Brave? Perhaps. But we all know that eventually hair grows back, and let me tell you, what a liberating feeling! I had a brand new ‘virgin’ head of hair, free of artificial color and chemicals. Woo hoo! The first few days were very exciting, I felt as bold as Sinead and Demi, and thought of all the beautiful women out there who at one time had clean shaven heads. With each passing day the mixture of dark and light ‘fuzz’ grew a little bit more, and I felt like a ‘chia pet’! Maintenance was easy – short showers, no fuss. I must confess that a few wigs, scarves and hats helped me through the first weeks in public, but by week three I already had a new funky and artsy ‘do’ and I was ready for anything.
My husband took many photographs and movies of me and helped to create a very positive experience throughout the process. He and our three amazing children told me how beautiful I was every day and I will be forever grateful to them for their support, non-judgment and unconditional love. I cannot say enough about the way each of them treated me in those beginning and crucial stages.
The reactions of friends, acquaintances and even strangers was overwhelming, with more attention, respect and opportunities for conversation than I ever expected. With each passing week I continued to get more and more compliments from men and women of all ages, which gave me a great deal of confidence and conviction to keep ‘the look’.
 IS GRAY NOT OK?
Years ago, in my early twenties, I spotted those pesky first few gray hairs, and I knew it was just a matter of time before they would multiply. My plan, however, was to color them, which I started doing in my early thirties. I never even considered not coloring my hair. I felt self-conscious about looking older than I was, and much better with no gray hair. Sound familiar?
What is is about our culture’s message that gets into our subconscious and creates agreement that it’s not okay to go gray? We see commercials, magazine ads, billboards and dozens of brands of hair color in every drug store and supermarket on a daily basis, reminding us at all times that we will attract a better man, a better job, and a better life, if we just color our hair? “Gray equals old” is so hard-wired into our psyches that we don’t even think there is a choice, and most of us don’t seem mentally ready in our 30′s, 40′s, even 70′s and 80′s, to contemplate anything but color. We actually think that by dying our hair we will look younger, not matter how we eat, exercise, rest, or take care of ourselves.
 SLAVE TO HAIR COLOR
Females around the age of 40 seem to color their hair mostly because of gray. When I first shaved my head and saw how much ‘salt’ as opposed to ‘pepper’ was coming in, my first instinct was to give it a few months before going back to coloring. I tried a few temporary colors that wash out immediately, but it felt very strange and I didn’t like it, nor did my family members. They preferred the new and natural me. At that time I resolved to give it at least one full year before making a decision, although I couldn’t imagine at that point ever going back to being a slave to hair color.
I sincerely believe that we should look as good as we can, and there’s no reason why it should change once you allow the natural silver, charcoal, pewter or gray to come out. My advice is, get a great hair cut, enhance your wardrobe with brighter colors to bring out your new coloring, enjoy brighter shades of lipstick, silver jewelry, and anything else you feel that will compliment your looks.
 IMAGINE THAT GRAY OR SILVER HAIR CAN BE SEXY & EMPOWERING!
 BELIEVE THAT YOUR NATURAL BEAUTY MAY JUST BE THE MOST BEAUTIFUL!
It’s up to us women to redefine and reinvent ourselves and decide how we’re going to live our lives and what values we are going to teach our children. If we start thinking differently, opening ourselves up to new possibilities and not caring so much about what ‘they’ will say, there is a good chance we will be happier and more comfortable in our own skin and even with our own natural hair color.
Seven years ago, when I shaved my head, there wasn’t a whole lot of support on the subject of gray hair, but thanks to several authors who have written books and bloggers who have written about the subject and Facebook to connect all the gray beauties out there, there is a great deal of support and camaraderie on line.
I hope that by sharing my story I may have inspired you to take plunge, and do something drastic, epic and perhaps life changing…together we will make it more than just ‘okay’ to go gray – we will make it ‘in’, ‘chic’ ‘the new glam’, and safe to have a new kind of sophisticated, sexy, wise and cool look.
Something inside me opened up when I shaved my head. It made me look at my vanity, my vulnerability and my judgments. I learned that confidence depends on attitude and the way we carry ourselves. A weight was lifted, a new me emerged, and it still feels really great to have done something so bold and dramatic that I can look back on and be proud of, and still enjoy the attention, compliments and freedom to this day.
profile pic smallShira Levy is a dedicated Mother of 3 who home schooled her children with her husband, runs a home-based educational software business with her family and is a real estate investor. She is also a vegan / raw food chef, an artist, musician and Toastmaster.


via:http://goinggrayblog.com/2014/01/girl-gone-gray-radical-makeover/

Accent Your Gorgeous Gray with this Fabulous Valentine’s Day Look

thumbnail
Welcome to Revolution Gray’s Beauty Corner!  This post is all about making your eyes look soft but enhanced buy using neutral, browns and plums.
The products used in this look are from  Salty Cosmetics .  Feel free to substitute your own brands with similar colors.  Salty Cosmetics are mineral shadows so you have to be careful when working with pigments and loose shadows because they tend to be messy and have fall out.
I used a flat shader brush to pack and pat on the color, a dense brush to sweep on the crease and another brush to dab on the brow bone and lastly a fluffy brush to blend the colors. Also when using loose shadows I suggest you put on your foundation last or place a tissue under your eyes when working with these kind of shadows.
Lids: Salty Cosmetics in the color Oh’ Sweet Revenge (golden peachy/pink shimmery iridescent shade)
Crease: Salty Cosmetics in the color Intoxcicating Grapes ( matte plum burgandy shade)
Brow bone: Salty Cosmetics in the color Nudist ( neutral peach shade)
Brows: Dark brown shadow with the Benefit Brow Gel Gimme Brow in light/medium
Eye primer: Mirabella
Mascara: No mascara in this look
Eyeliner: Salty Cosmetics Choco -tini ( dark brown matte shade)
Tight line with Salty Cosmetics Choco -tini ( dark brown matte shade)
Water Liner: NYX The Wonder pencil in medium
Let me know if you try it!
gray hair picturesMarian Marrero is a professional gospel singer, a mommy of two and a Beauty Blogger and Vlogger on Youtube. Marian is the founder of The Color Wheel Gallery Beauty blog where she inspires women to take an artistic turn to Eye Shading styles.  She considers herself determined and blessed that she is able to have a platform to encourage, inspire and inform.


via:http://goinggrayblog.com/2014/02/accent-gorgeous-gray-fabulous-valentines-day-look/

A Love Letter to My Gray Hair

pizap.com10.229017962235957381392286235275
Dear Natural Hair,
I am just writing to say I love you.
I never imagined I would love you as much as I do. Now that you are free from the dye I feel as though we have a closer connection than ever before.  So I want to share with you today all the things I love about you …
I love that you are happy being naturally you.
I love that you have got your natural bounce back.
I love that you don’t mind the wind or the rain.
I love that you are no longer tied to the dye appointments.
I love that you match pastel colors.
I love that you have so many various shades of glitter.
Most of all I love that you are free to be you.
I love you just the way you are.
Always,
Kama xx

gray hairKama Frankling, the author of ‘Daring To Be Grey’ began her journey to grey in 2011.  Although Kama will admit that she was initially resistant to going grey, she soon discovered that the journey was the ultimate confidence booster that she had needed. Kama feels more confident than ever before and now shares with others what she has learned about confidence and transitioning to grey.


via:http://goinggrayblog.com/2014/02/love-letter-gray-hair/

So Your Wife Wants to Go Gray…

1779764_355724644565343_114494448_n
Recently in the Wall Street Journal, comic” writer Rob LaZebnik details his wife’s desire to grow out her natural (silver) hair, and his terror that he will find himself suddenly “married to the Queen of England” if she does. He then describes how he manipulates his wife into continuing to dye her hair against her will…and relishes his own “cleverness” with obvious delight.
Here’s a response to this piece worth posting, a letter written to LaZebnik by Sara Davis Eisenman:
“As a woman in the prime of life who embraces my natural silver hair, I have a thing or two to teach LaZebnik. I see his primitive fear of silver hair, as well as the ‘clever’ way he coerced his wife to keep coloring, as an open invitation to prove every single one of his negative assumptions about silver hair and beauty absolutely false. 
In fact, I want to blow these ridiculous ideas out of the water with my own embodiment of their opposite. I want to show that women who embrace their truth in full – including their natural hair color – are some of the smartest, sexiest, most creative, most vital, and yes most beautiful, people on the planet. For your review, I have attached a photograph of myself, and I would like to ask the writer to consider how much I resemble the frumpy dried-up old granny that seems to so haunt his overactive imagination.
Yes, Rob Lazebnik, I love a challenge; so I personally thank you for writing this piece. Your whole ‘gray-haired lady = frumpy Queen of England’ equation simply adds fuel to my quest to be a straight-up silver siren. Consider it game ON! And if one day we happen to meet, I’ll tell your wife how beautiful she is, inside and out. Then, maybe I’ll give *you* the chance to kiss my sweet, silver, Queen-of-England…ring.”
Thank you, Sara.
via:http://goinggrayblog.com/2014/02/your-wife-going-gray/

Medium Length Hairstyles For Women Over 40 To Make Yourself Looks Good

Medium Length Hairstyles for Women Over 40
Medium length hairstyles for women over 40 are the best choice for women who want to looks stylish and beautiful even if they already on their 40s and most people thinking they are not too attractive anymore. It doesn’t mean that there is no proper way for them to looks beautiful even on that age, since with a good hairstyle you will be able to enhance your beauty and looks like someone in their 30s. But to do that, you will need to find the right hairstyle according to your body stature to ensure a good looks on yourself and making you looks younger and looks refreshing at the same time.
Finding a proper hairstyle to make you looks like someone in 30s will need a careful choice, because sometime even hairstyle can make you looks even older if you choose the wrong one. Even celebrities on their 40s often seek the best hairstyle which making them looks younger and most of the time they pick the right one and making them looks like someone in 30s. Andmedium length hairstyles for women over 40 are their favorite hairstyle pick to make their appearance looks younger and refreshing at the same time.
Layered bob is one among many hairstyle which looks good for women in their 40s, especially if they want to looks younger and refreshing at the same time. Medium wavy hairstyle is another pick if you want different looks on yourself. Bangs also can flatter your looks which popular among women and often combined with layered hairstyle. If you can’t find one that will looks good on yourself, try to consult your hairstylist and get some advice to find which medium length hairstyles for women over 40are going to looks great on yourself and enhancing your looks even if you are on your 40s.
via:http://www.mediumlengthhairstyles.net/medium-length-hairstyles-for-women-over-40-to-make-yourself-looks-good.html

From the Forum: How do you start wearing a hair system?

Image of cue ball
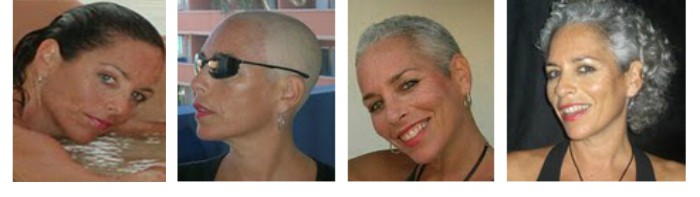
Recently one of our community members wrote apost on our forums about transitioning into wearing hair. Just exactly how are you expected to be thinning one day (or as he put it, bald as a cue ball), and then walk into work the following day with a full head of hair?

Get support

At HD, we always recommend being open about the fact that you wear hair. Now I'm not saying you should climb to the top of the nearest mountain and yell it from the top of your lungs, and I would never expect you to tell someone upon first meeting them either! However, it can ease your anxiety to let a few close friends and family in on your secret. We're really trying to erase the stigma that comes with wearing hair, and in my opinion, it should be viewed no differently than getting highlights or extensions. With any transition in life, having a support system makes it so much easier! 

Go bold

With that being said, we would never want you to do something that you just aren't comfortable with. Whether you choose to tell a few friends and family or keep it a secret from everyone, the easiest way to make the transition into wearing a system less noticeable is by creating a distraction--doing something to draw the eye away from your hair. Here are some things clients have done in the past that have worked successfully for them:
  • Try styling your hair differently for a few weeks prior to attaching your system. If you normally part your hair, have the system made with that part. Try brushing it forward or spiking it all up for a few weeks prior to receiving and attaching the unit.
  • If your hair is longer, wear a pony tail for a little while prior to receiving the system. When you get the system, wear the hair down.
  • Fellas...grow a beard!  Now I'm not just saying that because I love a little scruff. Grow a beard (or any facial hair) and then shave it the same day that you do your attachment. If you currently have a beard, again, shave it the day that you do your attachment. People will be so surprised by the fact that all of that hair is gone, that they won't even notice that you have more hair on the top of your head! This is a tip from our Community members that seems to work like a charm time and time again!
  • If you normally wear contacts, wear your glasses while you transition into wearing a system, or vice versa.
Again, the trick is just to do something different. That way, people will look at you and know that something is different, but they just won't be able put their finger on what it is! 

Pace yourself

Another thing to keep in mind is to just not try and do too much, too soon. Unless you are comfortable telling people about your system, start with a light density. Starting with your ideal hair density, or the density that you had before your hair started thinning, will really raise some red flags. Go with something just slightly heavier than your growing hair; maybe start with one step up from your current density. With each system, gradually go a bit thicker. Just increase the density in small steps, until you get to your ideal density.
If your hairline is significantly recessed, start with a system that is a bit smaller in length than your ideal. You can gradually lower their hairline in increments of a quarter of an inch or so, until you have the hairline positioned where you want. Did you know you could do that?
Any transition can be difficult, or even scary. I promise you that wearing hair does get easier over time, but hopefully these tips and tricks can help ease that initial nervousness that everyone will feel prior to attaching their first system.
If you have any questions or tricks for our readers, post them below. We love to help andlearn!
via:http://www.hairdirect.com/community/blogs/hdblog/archive/2014/02/03/from-the-forum-how-do-you-start-wearing-a-hair-system.aspx

Proactively Navigating The Changing Climate In The Hair Replacement Industry

Dung Dao, VP of Global SupplyIt's been a while since you've heard from me, I admit. Let's just say that since the day I started working here I've been alittle busy...
You see, I'm the guy who is responsible for ensuring your hair system is properly made and delivered to you as scheduled, and at the best possible value. I'm also the guy who constantly works with the founder of Hair Direct to come up with new product ideas for hair wearers. You may not know this, but I am a long time customer of HD. And, for the last few years I've been the VP of Global Supply Chain.
You've asked questions in the Community and maybe have experienced some hiccups in your orders. Now that the new year is in full swing, I'd like to update you on the current supply landscape of the hair replacement industry and what we've been doing to stay ahead of the curve.   

Big changes in China

As a customer myself, I understand your emotional stressors when it comes to your hair and I understand your need for a quality and timely product. Since my focus is supply chain, I know what we must do to meet those needs on a sustainable basis. To successfully provide viable products for our customers well into the future, I have spent the majority of my time over the past three years in Southeast Asia, developing a growing supplier network spanning across four different countries (so far).
As new industries move into China, it has also attracted the labor force away from the hair industry with much less labor-intensive jobs. In addition, this has caused labor costs to increase.
It was not too long ago that factories had hundreds or even thousands of workers under one roof to produce handmade hair systems from start to finish. That is no longer the case. Factories now have most of the ventilation work done remotely by contracted workers. To make matters worse, because of the limited amount of ventilators available, many of the factories end up having to share them. This often results in delays and inconsistency in workmanship, as has been experienced throughout the industry as of late.

Building relationships with new suppliers takes time

Finding and grooming factories that can produce hair systems to our standards takes time, and a lot of relationship building. There is a lengthy process required to establish clear communication across different cultural divides to reach a common understanding of language being used, best practices and standards for our products. After more than six months of qualification testing and trials, our supplier network has expanded to include two more new partnering factories in countries outside of China, with a third one scheduled to go live by the second quarter of 2014. As our business grows alongside the ever-changing global economy and its supply chain, we continue to search for additional partners in other parts of the world so that we can be prepared to bring them on when consumer demands require further expansion.    

Moving forward with positive feedback

We've been shipping orders from our current supplier network and have gotten a lot of positive feedback. Further relationship building with our partners will continue to translate into improvement in delivery times and product consistency for our customers going forward. In 2014, we will further focus on establishing a common standard for our hair systems among all the factories so that regardless of where a system is made, the same quality and consistency can be expected. This is not a quick or easy thing to do but we are determined to take it on head first! As Josh and Melissa have mentioned, we'll also begin to further streamline the ordering process and develop comprehensive specification guidelines so we can be more accurate in advising customers and factories with custom order design and manufacturing. 
I've spent over 29 years of progressive professional experience in corporate/plant/engineering/project management and new business/product development both in the U.S. and Asia with quite a few patents on products and processes under my name. Having done and seen all that, I can say with certainty that hair system manufacturing is perhaps one of the most complex handmade products in the consumer market today. Being able to deliver a system which meets our customer's expectation time and time again is no small task. Yet, that is our commitment to you--our customers--to provide an exceptional customer experience each and every time we are given the opportunity.
We're doing our best to navigate a challenging industry and bring you the best product we can at a great value. If you have any comments or questions, please feel free to leave them below. We'd love to hear what's working for you or how to help you have a better experience.
via:http://www.hairdirect.com/community/blogs/hdblog/archive/2014/02/11/proactively-navigating-the-changing-climate-in-the-hair-replacement-industry.aspx

How to Color a Long Hair System

At some point during your tenure as a hair wearer, you're likely to have to color a hair system. Oxidization is inevitable. There's tons of information online (including on our own site) about how to color a hair unit, but a lot of the information does not take long hair into consideration.
When coloring a system with long hair (or even a larger base size), it is harder to get aneven result from the color. It is also harder to keep the color off of the base of the unit! So with all of the information out there telling you how to color system with short hair,what are you supposed to do if you do not fall into that category? A lot of the instructions are the same, but a question in our Community inspired me to provide some additional tips and tricks for coloring a system with long hair!
[For the record, the crazy red color used in these photos is just for contrast, so you can clearly see the color and where it is applied.]

Special considerations for mixing and processing

Regardless of the hair length, color for a hair system must be processed and mixed a little bit differently than if it was being applied to your growing hair. In house, we use Wella Color Charm on systems that need to be colored. You can find instructions about how to actually mix the color in the learn section of the website. As mentioned on that page, the color is also only processed for a few minutes, unlike the 30 minutes that you would leave it on your growing hair.
Mixing hair colorPlease note that we do not follow the instructions on the color box since it needs to be diluted and mixed with different proportions than recommended for growing hair. This is because the cuticle (or outer layer of the hair shaft) has been removed, causing it to absorb color much faster.
So first things first: make sure you mix the color properly for a processed hair system and make sure you don't leave on your system too long.

Work in small sections

Color hair is small sectionsSince the color processes so quickly, I recommend working in small sections. If you are trying to evenly apply color to a full cap unit that has long hair, you may run into some problems getting the color on quickly enough so that it is an even color after it processes for 3 minutes. If it takes 10 minutes to get the color on, the area where you started applying the color is going to be pretty dark by the time you rinse it off. I recommend splitting the hair into smaller sections. 
How to do it:
  • Make sure the hair is dry.
  • Start at the back of the unit. Apply the color, process it, rinse it out.
  • Dry any hair around it that got wet in the process.
  • Follow the same steps on the sides, then the top, and do the front last.
It can be time consuming, but as you are getting more comfortable applying the color and increasing your speed in doing so, it can help you achieve a more even hair color throughout the unit. Just be sure to clip the hair that you are not coloring out of the way, so that you can clearly see what you are doing and have better control over it.

Back to front

If you're working in larger sections, it is always best to start in the back of the unit and move forward.  Most people's growing hair is darker in the back, and it just looks natural to have a little bit of a lighter color framing your face. If you start in the back, apply the color in the front of the unit last, and then let it process for an even amount of time, the front of the unit will be slightly lighter than the rest, and the darkest color will be in the back. 

How to apply the color

Color hair is small sectionsWhen mixing the color as instructed and then diluting it, the color is bound to be a bit runny and thinner than what you may be used to working with. This can make it more difficult to actually apply and keep off of the base. I recommend using a hair color brush and parting the hair in very thin sections (within the smaller section that you are working with) to actually apply the color. Make sure that you do not have too much color on the brush so that you are able to control the amount of color being applied to the hair, which will help prevent it from running it down onto the base.
Tip: When applying color to a system, use a fine tooth comb. Comb the color through a small section of hair. This allows you to really control how much color you apply to the hair, but also helps you move faster and ensures the hair is evenly saturated.

What if it's too dark?

If the color ever gets a little bit darker than anticipated, don't panic! Just wash the hair as soon as possible with a good clarifying shampoo, and it will help lighten the color. You may have to do it a few times. Of course, it will also fade over time. Until you determine exactly what color is the perfect match for your system, you may want to err on the side of caution and pick a color that looks a few shades lighter than what you are aiming for. It is much easier to color a system again to get it darker, than wait for it to fade.  If you are shooting for a huge change and you are not comfortable doing it on your own, just send the system to us and we will take care of it for you!  
Everyone has different methods for applying color, but hopefully these suggestions will help make it a little bit easier for you. If there is something that works well for you, please share it below! I am always looking for new techniques to try!
via:http://www.hairdirect.com/community/blogs/hdblog/archive/2014/02/18/how-to-color-a-long-hair-system.aspx

How to Design a Natural Front Hairline

The quest for a natural front hairline is probably the most commonly talked about subject amongst hair wearers. And why wouldn't it be? After all, if it doesn't look natural...what's the point? Well, the point is everyone has their own opinion as to what "looks natural" for them. So how do you go about designing your most natural front hairline?

Recession isn't always a bad word

One of the most important things to decide on is the amount of recession that is age appropriate for you, or the amount of recession that you're comfortable with. Everyone has what we call "recession"--that goes for men and women. All that means is that no one has a straight line of hair across their front hairline. When we think of recession it might conjure up images of that drastic "V" appearance, but that's an extreme example.
Typical hairline recession is a softening of the hairline and the shape it creates. If you're not really sure how to choose the best amount of recession then you can certainly ask for a set of "frontal guides" to be sent to you, or they come in our custom fitting kit. Each frontal guide is a different hairline shape. To determine which one is right for you, simply place each one directly against where you want your hairline to begin. You will be able to see how that particular hairline shape would look on you. Then, choose the best one, and we'll make the front of your hair system to match that shape.

Go high def

Let's face it, no one, not even those with naturally thick hair have a dense line of hair at their front hairline. There is a natural transition starting with finer hairs that graduate to a fuller density. This can be replicated on a full lace or lace front system with our "high definition hairline" design. In a high def hairline, the hairs are individually knotted in to the lace material to mimic a naturally growing hairline. After the hair has been knotted into the base material, the knots can be bleached to lighten their appearance, giving an even more natural appearance.

Lace for the base

There are lots of different types of base materials but for the most natural front appearance, you'll want to use lace. There are different types of lace, and for those who can afford it, disposable lace will give you the best appearance. That said, it is, well...disposable, so they don't last very long. For something more durable, go with Hollywood (Swiss) lace, and you get a totally natural appearance with that too, but it will last a little longer.

Stay true with glue

To keep this hairline looking the most natural during your attachment, you would want to use a liquid adhesive (glue). The choice of liquid adhesive is really up to you and the amount of bonding time that you want to achieve. Any liquid adhesive can be used with lace-based materials, you just need to make sure that it is dry before pressing the lace into it. Using a liquid adhesive allows you to bond the lace as close to your scalp as possible, giving you a very natural front hairline appearance. And who wouldn't want that?
Listen, the point of wearing a hair system is to first and foremost cover any balding/thinning area. But, the very next point of importance should be achieving the most natural front hairline appearance that you possibly can. Everyone is unique and different, but I think it's pretty safe to say that all hair wearers want their hair to look natural.
I know that there have to be questions or comments that you have on this subject, so fire away! Let me know what you have to add. Post your comments below so we can all benefit.
Until Next Time...Happy Hair Days!
via:http://www.hairdirect.com/community/blogs/hdblog/archive/2014/02/21/how-to-design-a-natural-front-hairline.aspx

Six Reasons Why A Full Cap Might Work Better For You

Guest Post: The following post is by hair wearer and RemySoft founder, Jon Robertson, known to much of the hair replacement community as JRobMore about Jon below.
Jon with and without his full cap hair systemWhen I first started wearing a full cap hair system I didn't have much of a choice. The growing hair that remained on the sides and back of my head was becoming too thin to allow me to achieve the illusion of real hair with a partial unit so I was forced to find an alternative or give up hair wearing altogether.
If you're in a similar situation or if there are certain aspects of wearing a partial hair system that don't appeal to you, a full cap may be the answer.
Here are six reasons why a full cap may be the right choice for you:

1. You're tired of the color mismatch game

In some cases utilizing your own growing hair can help you achieve a more realistic result, but matching the hair system's color to your existing hair and maintaining that color throughout the life of the unit can be a challenge. If that's the case, you might find it less of a hassle to deal with color if you're wearing a full cap.

2. You have the blending blues

When it comes to the area where your growing hair meets your hair system, maintaining a proper color match is only half of the battle. Even if your new hairpiece color matches your growing hair perfectlyyou will still be faced with the challenge of achieving a good blend.
Blending is almost as important as getting the right color, but despite a good quality blend from the factory or your stylist, a partial unit can sometimes be tricky to match to your existing hair. Due to texture variations in the hairpiece hair, differences in curl diameter and any variations in the way the hair is ventilated into the unit versus the growth pattern of your existing hair, there are lots of variables to contend with.

3. You want more versatility

When you integrate your existing hair into your hairpiece design you may be limited to certain hairstyles based upon the length, color and growth pattern of your own hair. A full cap allows you to have virtually unlimited style and color choices, and you are free to change things up on a moments notice. Plus, there is no need to wait for your own hair to grow out if you want to switch to a longer hairstyle.

4. You don't always need hair 

Traveling can be stressful enough without having to worry about dragging along a suitcase full of hair products and having to locate a private area where you can perform your hair maintenance routine. And even hair-wearing veterans have days where they just don't feel like dealing with their hair. A full cap allows you the option of having absolutely no hair at all, which for many people is a fashionable style all its own and a preferable alternative to the "bald on top" look.
So, if you want to have the option of being able to go completely bald when the mood strikes, a full cap will give you that versatility.

5. You don't want to deal with haircuts

If you don't like the idea of cutting your own hair and you would rather not have to visit a hairstylist every few weeks, a full cap may be the right choice for you. Partial hair systems require maintenance cuts to keep your growing hair shorter than the hairpiece hair. Every few weeks you have to either visit a stylist or cut your hair yourself. Hair stylists can be expensive and cutting your own hair requires a certain amount of skill that can take a lot of time to master.

6. You are at the end of your rope

As I mentioned earlier, I started wearing a full cap out of necessity.
Unfortunately for some of us, we are destined to lose not only the hair that is on the top of our head, but we will also lose a good portion of the hair on the sides and back as well. This can make it extremely difficult to achieve a good result with a partial hair system, and eventually it can get to a point where a full cap is your only viable option.
If you've struggled with the decision to switch to a full cap or have some tips that might help others, please feel free to share them in the comments below.
via:http://www.hairdirect.com/community/blogs/hdblog/archive/2014/03/03/six-reasons-why-a-full-cap-might-work-better-for-you.aspx

Liv Tyler Hairstyles for Narrow Face Shapes

Liv Tyler has one of the most recognizable faces in Hollywood—the huge blue eyes, the porcelain skin and of course those lips! Liv is also known for her gorgeous espresso brown hair that she occasionally highlights, but usually keeps dark and dramatic. She has barely aged over the years (what's her secret?!) and she knows how to pull of the natural look when it comes to her makeup. Her hairstyles always look fantastic and provide great style inspiration for other women who have narrow face shapes. But how do you know if your face is narrow? Like Liv, your face width will remain more or less uniform from forehead to jawline, and will then taper down into a rounded chin. If this applies to you, keep reading to find out which hairstyle will suit you, thanks to lovely Liv!
Liv Tyler hairstyles
In her most recent photo, Liv is going for a classic long layered style that falls just past her shoulders. Liv told Marie Claire magazine that she swears by her hairstylist Eugene Souleiman's low maintenance cuts, that are typically long with only a few layers cut in. To style her hair on a daily basis, Liv loves to let it air dry so her natural waves can come through. This style is slightly more polished for the evening however, and looks like it has been given added bounce and curl by blow-drying it using a round brush to style. If you love the high intensity shine of Liv's hair, try her swear-by hair trick and blast your hair with cold water after you have finished washing it.
Liv Tyler hairstyles
Here is Liv's casual beach boho look that is the perfect 'do for narrow faces. The centre hair part adds width to the face while the layers create volumearound the cheek and chin area. This counteracts the narrowness of her face shape and balances her silhouette better. If you have natural waves, then this is one low-maintenance cut that you will love. It will only take a few minutes to wash and air dry, à la Liv. If your hair is straight, try twisting your towel dried hair into a loose bun and let dry. Then, unroll it and work your fingers through to get these messy waves. To keep this style all day, add some styling wax through the ends to give to some structure.
Liv Tyler hairstyles
Here, Liv is sporting an even shorter bob that looks amazing with her narrow face shape. By adding waves throughout her hair, Liv creates volume and width to avoid looking too narrow or slim throughout the face, while the length reduces the appearance of a long face. This is a great cut for women who wish to reduce the appearance of a long face shape or look fuller in the cheek area. To get this look, you can simply wash and go if you have wavy hair. If your hair is straight, you can use a curling wand to add waves throughout. Try working in a random pattern to get a beachy look, or use precise sections to get more polished waves.
Liv's haircuts provide great style inspiration for women with narrow face shapes, but her best beauty tip is to work with what you've got and let your natural beauty shine through.
via:http://www.thehairstyler.com/blogs/celebrity/liv-tyler-hairstyles-narrow-face-shapes

Dawn Olivieri's Shoulder Length Hairstyles

Dawn Olivieri is definitely a fan of the shoulder-length bob. Her hairstyle hasn't changed much over the years, but she has managed not to look boring or fall into a style rut. This is because she really experiments with her styling techniques and makes her bob look anything but blah. If you love to wear your hair in a simple, shoulder length hairstyle and need ideas on how to style it up, take a look at these fabulous ways to wear your hair, direct from Dawn Olivieri.
Dawn Olivieri hairstyles
Here, Dawn works her hairstyle by adding ringlets to her long bob. To get this style, you need to think volume, volume, volume! Start by adding hair mousse or a root booster to your towel-dried hair. Then, blow-dry it using a large round brush to add height at the roots and sleekness to the lengths and ends. Now you are ready to add in those ringlets. If you want perfect coils like Dawn, use small sections and curl them using a curling iron with a barrel that is around one-half to one-inch in diameter. Spray each curl into place after it has been set to keep them all separated, as seen here. Another cool thing about his hairstyle is the soft ombré hair color. This curly hairstyle will show off your highlights so make sure to get a color refresher if you plan to wear this hairstyle on an important night out.
Dawn Olivieri hairstyles
If you want to go for a more casual look, why not try out Dawn's beachy bob? This is a fabulous hairstyle that will work for day or night, depending on how you dress it up (or down). Another bonus besides its versatility is that it can be styled in minutes. For girls on the go, simply section your almost-dried hair into four to six segments, working your way around the head. Think of orange segments for this and section them from top to bottom, not horizontally. Then, take each section and twist it into a bun and let your hair dry naturally (this can even be done the night before). When your hair is dry, unroll your sections, shake your fingers through your hair and spray into place. You will have cool, random waves throughout your hair. If you prefer to use a styling tool, use large sections of hair and wrap them around a styling wand, leaving a couple of inches out at the end to get these soft, kinky waves.
Dawn Olivieri hairstyles
Finally, you may want to copy this wavy bob if you are after a sophisticated,sleek look for the evening. You can get this look by either:
 Blow-drying your hair straight and then curling sections of hair using a curling wand, or
 Blow-drying your hair using a round brush to dry the hair straight from root to mid-length and then adding soft spirals at the ends.
The latter method takes more skill with a hair dryer so feel free to use a styling tool to help. Make sure to spray this hairstyle in place to keep it looking glamorous all night.
As you can see from Dawn, a plain bob can be anything but boring if you use your creativity when it comes to styling it up!
via:http://www.thehairstyler.com/blogs/celebrity/dawn-olivieri-shoulder-length-hairstyles